Effective attendance management software can significantly reduce the workload of both the HR department and the finance department. Automated attendance management goes even a step further to totally take reporting out of human hands.
Amzy caters to both these requirements. Companies with thousands of employees can easily utilise existing attendance capture devices like fingerprint, RFID…etc. There is no need to rip out existing infrastructure. Amzy attendance management system will integrate right in.
To quickly get in touch, send us a text on our 24/7 live chat!
Amzy web application
It is a SaaS software that runs on any web browser, be it desktop or mobile. This is why it is perfect for modern workplaces where working from home is often required.
Different companies have different ways of calculating overtime. Due to this, Amzy comes with the unique ability to change calculation algorithms to suit the company. Add to this, Amzy can also cater to the needs of all managers by facilitating tailor made reports and graphs.
Orpheus Digital has deployed Amzy for several companies already! So, there is definitely clients to back us up on our claims!
Attendance data capture
Download data from existing attendance capture devices like fingerprint scanners, RFID scanners…etc and upload onto the Amzy portal
Every Amzy deployment will have tailor-made integrations for existing attendance capture systems present in the company
Use IoT devices to directly upload attendance data to Amzy in realtime
Dashboards and tables
See employee stats and any other detail at an instant using rich graphical dashboards.
Rich animated dashboards to view all the required statistics at a glance
On the other hand, there are all kinds of table views to get more detailed data:
Variety of filtering options to quickly get the data you want even from large datasets
Attendance reporting and leave management
It is incredibly easy to use the calendar view to manage employee leaves, and even public holidays. And guess what, you can do that right on your mobile phone too!
The calendar view being used on a mobile phone
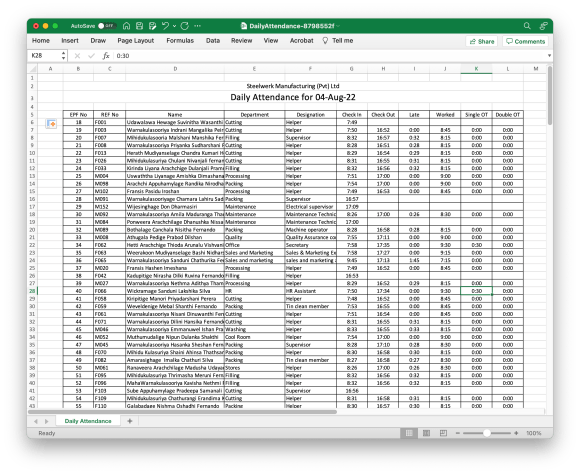
Report generation is the one of the key value areas when it comes to Amzy. Amzy can generate any type of report, regardless of its complexity. The reports are generated as Excel spreadsheets that can be easily printed or even processed further.
Excel spreadsheet showing the daily attendance and OT statistics
Security and data protection
Amzy uses industry-standard SSL certificates. To use the system, all users must sign in with a password unique to each user. Super admins can grant different levels of permission to each user in the system. The system encrypts sensitive data like bank details on a database level. Furthermore, Amzy also has an innovative action log that contains entries for all actions and the user who made the actions:
This gives a whole new level of accountability!
I want it!
Like what you see? Fill in your details below and send us a message for a demo or to share a cuppa!
React Native is the development platform if you are a startup and thinking about developing for both iOS and Android. Apart from containing a ton of source material and community support, development happens in JavaScript. JavaScript is a language that is easy to grasp. Developers are quite likely to have come across JavaScript at least once in their lives. Facebook is its the main contributor and initiator.
Orpheus Digital recently moved from Cordova to React Native. Cordova basically serves web pages in an embedded browser. This has serious performance bottle-necks, specially on budget or mid-range devices. However, Cordova had been around for a longer time therefore the community was larger and more varied. This strong point was being exhausted slowly as React Native was maturing and collecting a strong community.
The strong community resulted in intricate tool kits to make development easier. One of these tools is Expo. We at Orpheus Digital are fans of this tool. This toolkit makes coding production-ready mobile apps a breeze. It takes care of all the mundane tasks and provides infinitely helpful extras like OTA debugging. Code-wise there is not much that differs from vanilla React Native development.
StoreBoss is an app based on this stack that we created. The first app we made using this stack is also StoreBoss. The link #ReactNative will get you to the other articles we have regarding this mobile development stack.
Let’s assume that you have already set up React Native and Expo (seemingly straightforward process that is provided in their respective websites). We will now move onto the material design framework that we, at Orpheus Digital, also use!
React Native Paper
This is the Material Design framework we will be using. Installing this framework is as straightforward as it can get:
yarn add react-native-paper
If you are not using Expo, you would also have to run,
yarn add react-native-vector-icons
react-native link react-native-vector-icons
This adds the library to our project. Now we will use it in our code to render some Material Designed UI elements.
The React Native Code
Startup Code
We like to isolate the starter code from the actual app. So we will have have two JS files: one named App.js which will contain our starter code and another called MainScreen.js (in a folder called src) which will contain our first actual UI.
/*App.js*/
import * as React from 'react';
import { Platform, StatusBar } from 'react-native';
import { DefaultTheme, Provider as PaperProvider } from 'react-native-paper';
import MainScreen from './src/MainScreen';
These import statements all reflect the aforementioned structure of our app. PaperProvider is the root component that our Main component should be wrapped under for the theme to work.
We will also look into defining our own colors for the app, hence the import statement for DefaultTheme.
The ellipsis (triple dot notation) allows you to only modify the parameters of the theme that you want to while keeping the other parameters unchanged. We have defined our own roundness parameter, and primary & accent colors.
We specify the custom theme we created earlier as a parameter for the PaperProvider. The StatusBar element refers to the area of the UI where the time, battery status…etc are shown. We are using a neat trick to make the content area darker or lighter based on the OS for improved legibility using the Platform React Native API.
MainScreen Code
Next we will layout our Appbars and buttons for our main UI screen.
/*MainScreen.js*/
import React from 'react';
import { Text, View, Alert } from 'react-native';
import { Button, Appbar } from 'react-native-paper';
The good thing about the Paper framework is that the components need to be imported as required. This is a good thing for two different reasons:
Decreases overhead – you import only what you need for that view
Improves flexibility – maybe you want to use a button from another library in just one screen
/*MainScreen.js*/
export default class MainSceen extends React.Component {
    constructor (props) {
        super(props);
        this.state = {
        }
    }

	render () {
		return ([
		  (
			<Appbar.Header key="1">
			  <Appbar.Content
				title={<Text>Hello</Text>}
				subtitle={<Text>Subtitle</Text>}
			  />
			  <Appbar.Action icon="filter" onPress={() => {
				Alert.alert("Alert", "You pressed on the filter button!");
			  }}/>
			</Appbar.Header>
		  ),
		  (
			<View key="2" style={{margin: 10}}>
				<Button icon="camera" mode="contained" onPress={() => Alert.alert("Alert", "You pressed on the contained button!")}>
					Press me
				</Button>
				<Button icon="camera" mode="outlined" onPress={() => Alert.alert("Alert", "You pressed on the outlined button!")} style={{marginTop: 10}}>
					Press me
				</Button>
			</View>
		  )
		]);

	}
}
This is our entire MainScreen.js A relatively new feature in React Native is the ability to use a key parameter in the return statement of the render() function to string together different components without having to wrap the components in a parent element. The individual components are instead provided as an array.
Also note how the Appbar component is consumed.
Now, the project can be run using the start command
yarn start
The output app will look similar to this on the two different platforms. The main reason for our liking of the React Native Paper library when opting for a material design interface is how the styling adapts to more of an iOS-like theme when the app is run on iOS.
The interaction with the buttons reveals the ripple effects.
Our test app running on Android
Our test app running on iOS
Thus, we conclude the Technically Speaking post for today. The project can be accessed from our GitHub repository